Python 扫盲
Python 程序设计扫盲
1. Python 基础
Python简介、基本语法、类与对象、数字类型、运算符、内置函数、顺序条件分支控制结构
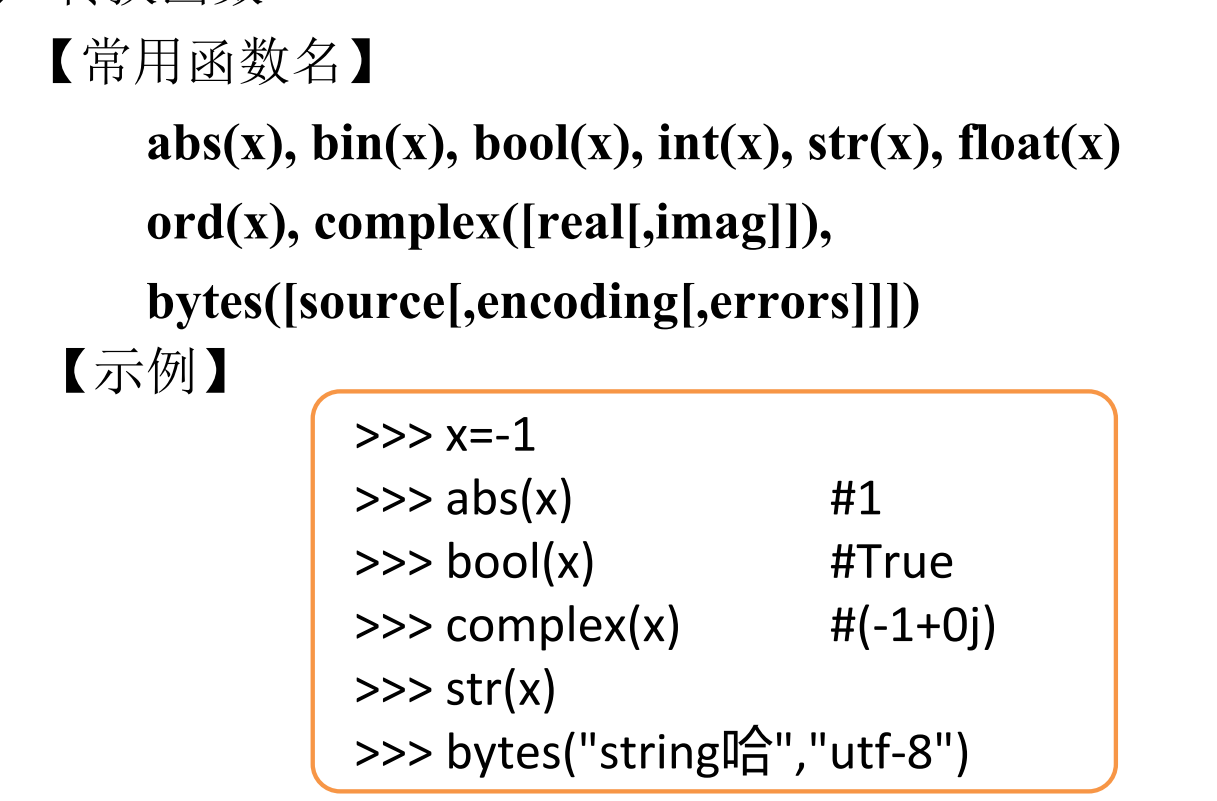
内置函数
能够直接被调用的函数,Python提供了67个内置函数
多路分支结构 if-elif-else
将百分制转换为5分制。转换规则为:90分及以上者转为5分,80分及以上者转为4分,70分及以上者为3分,60分及以上者2分,不及格为1分
def convert_to_5_point_scale(score):
    if score >= 90:
        return 5
    elif score >= 80:
        return 4
    elif score >= 70:
        return 3
    elif score >= 60:
        return 2
    else:
        return 1

# 测试一下
scores = [95, 85, 75, 65, 55]
converted_scores = [convert_to_5_point_scale(score) for score in scores]
print(converted_scores)  # 输出 [5, 4, 3, 2, 1]
集合之列表
成员:任何合法的数据类型 且 多个成员的数据类型可以不同
但是如果数据类型不同 则一些操作不允许 如排序操作
常见的几种访问方式:
# 定义一个列表,包含整数和字符串
list = [1, 2, 3, 4, 'zxd', 'zdj']

# 打印列表的全部内容
print(list)         # [1, 2, 3, 4, 'zxd', 'zdj']

# 打印列表的类型
print(type(list))   # <class 'list'>

# 访问列表的第一个元素
print(list[0])      # 1

# 访问列表的倒数第三个元素
print(list[-3])     # 4

# 访问列表的最后三个元素
print(list[-3:])    # [4, 'zxd', 'zdj']

# 访问列表的第二个和第三个元素
print(list[1:3])    # [2, 3]

# 以步长为2访问列表的元素
print(list[::2])    # [1, 3, 'zxd']

# 反转列表
print(list[::-1])   # ['zdj', 'zxd', 4, 3, 2, 1]

# 将列表拼接三次
print(list * 3)     # [1, 2, 3, 4, 'zxd', 'zdj', 1, 2, 3, 4, 'zxd', 'zdj', 1, 2, 3, 4, 'zxd', 'zdj']

# 访问列表中第五个元素的第一个字符
print(list[4][0])   # z
常用的一些方法
my_list = [1, 2, 3, 4, 'zxd', 'zdj']

# 在列表末尾添加一个元素
my_list.append(5)
print(my_list)  # [1, 2, 3, 4, 'zxd', 'zdj', 5]

# 通过添加一个可迭代对象中的所有元素来扩展列表
my_list.extend([6, 7, 8])
print(my_list)  # [1, 2, 3, 4, 'zxd', 'zdj', 5, 6, 7, 8]

# 在指定位置插入一个元素
my_list.insert(2, 'new')
print(my_list)  # [1, 2, 'new', 3, 4, 'zxd', 'zdj', 5, 6, 7, 8]

# 删除列表中第一个值为 'zxd' 的元素
my_list.remove('zxd')
print(my_list)  # [1, 2, 'new', 3, 4, 'zdj', 5, 6, 7, 8]

# 删除并返回最后一个元素
element = my_list.pop()
print(element)  # 8
print(my_list)  # [1, 2, 'new', 3, 4, 'zdj', 5, 6, 7]

# 删除并返回指定位置的元素
element = my_list.pop(1)
print(element)  # 2
print(my_list)  # [1, 'new', 3, 4, 'zdj', 5, 6, 7]

# 删除列表中的所有元素
my_list.clear()
print(my_list)  # []

# 添加元素以演示其他方法
my_list = [1, 2, 3, 4, 'zxd', 'zdj', 2, 3]

# 返回列表中第一个值为 'zdj' 的元素的索引
idx = my_list.index('zdj')
print(idx)  # 5

# 返回列表中值为 2 的元素的数量
cnt = my_list.count(2)
print(cnt)  # 2

# 对列表进行原地排序
num_list = [5, 3, 1, 4, 2]
num_list.sort()
print(num_list)  # [1, 2, 3, 4, 5]

# 反转列表
num_list.reverse()
print(num_list)  # [5, 4, 3, 2, 1]

# 返回列表的浅拷贝
new_list = my_list.copy()
print(new_list)  # [1, 2, 3, 4, 'zxd', 'zdj', 2, 3]
for 循环
for-i 循环:建立3*3矩阵并输出
# 初始化一个空的 3x3 矩阵
matrix = []

# 使用嵌套的 for 循环填充矩阵
for i in range(3):
    row = []
    for j in range(3):
        row.append(i * 3 + j + 1)  # 填充矩阵
    matrix.append(row)

# 打印矩阵
for i in range(3):
    for j in range(3):
        print(matrix[i][j], end=" ")  # 打印矩阵元素并在后面加上一个空格
    print()  # 打印完一行后换行
for-else 结构:
在Python中,for循环的else子句在循环正常完成时执行。也就是说,如果for循环没有遇到break语句并且顺利完成迭代,那么就会执行else子句中的代码。如果for循环被break语句中断,else子句则不会执行。
for-else结构的引入是为了使一些特殊情况的处理更加简洁和直观。特别是在搜索和遍历等场景中,这种结构可以避免额外的标记和嵌套,使代码更具可读性。
numbers = [1, 2, 3, 4, -5]

for num in numbers:
    if num < 0:
        print("List contains a negative number.")
        break
else:
    print("All numbers are positive.")
for-each 结构
my_list = [1, 2, 3, 4, 'zxd', 'zdj']

# 使用 for-each 循环遍历列表并打印每个元素
for element in my_list:
    print(element)
2. 异常处理
基本结构
Python的异常处理主要通过 try、except、else 和 finally 四个关键字来实现:
try:尝试执行可能会引发异常的代码块。except:捕获并处理try代码块中引发的异常。else:如果try代码块中没有引发异常,执行此代码块。finally:无论是否引发异常,都执行此代码块,用于清理资源等操作。
# 若输入的不是整数 或 除数为零 进行异常处理
while True:
    try:
        num = int(input("Enter a number: "))
        print(4 / num)
    # 注意缩进 异常处理要在里面
    except ValueError:
        print("Invalid Integer")
    except ZeroDivisionError:
        print("Invalid Zero")
    finally:
        # 无论是否引发异常,都执行
        print("Execution completed.")
多个 except 块
你可以使用多个 except 块来捕获不同类型的异常:
try:
    # 可能会引发异常的代码
    value = int("not_a_number")
except ValueError:
    # 捕获并处理 ValueError 异常
    print("Error: Invalid input. Please enter a number.")
except ZeroDivisionError:
    # 捕获并处理 ZeroDivisionError 异常
    print("Error: Division by zero is not allowed.")
else:
    # 当没有引发异常时执行
    print(f"Value: {value}")
finally:
    # 无论是否引发异常,都执行
    print("Execution completed.")
捕获所有异常
你可以使用通用的 Exception 类来捕获所有异常,但这样做时应小心,因为这可能会隐藏其他意想不到的错误:
try:
    # 可能会引发异常的代码
    value = int("not_a_number")
except Exception as e:
    # 捕获所有异常并处理
    print(f"An error occurred: {e}")
else:
    # 当没有引发异常时执行
    print(f"Value: {value}")
finally:
    # 无论是否引发异常,都执行
    print("Execution completed.")
自定义异常
你可以定义自己的异常类,用于特定的错误情况:
class CustomError(Exception):
    pass

try:
    # 可能会引发异常的代码
    raise CustomError("This is a custom error message.")
except CustomError as e:
    # 捕获并处理自定义异常
    print(f"Custom error occurred: {e}")
finally:
    # 无论是否引发异常,都执行
    print("Execution completed.")
3. 函数与函数式编程
可变位置参数 (*tuple_args)
使用星号 (*) 表示函数可以接收任意数量的位置参数,这些参数会被收集到一个元组中。
def print_values(*values):
    for value in values:
        print(value)

print_values(1, 2, 3, 4, 5)
可变关键字参数 (**dic_args)
使用双星号 (**) 表示函数可以接收任意数量的关键字参数,这些参数会被收集到一个字典中。
def merge_dicts(**kwargs):
    result = {}
    for key, value in kwargs.items():
        result[key] = value
    return result

merged = merge_dicts(a=1, b=2, c=3)
print(merged)  # {'a': 1, 'b': 2, 'c': 3}
def example_function(arg1, arg2, *tuple_args, **dic_args):
print(f"arg1: {arg1}")
print(f"arg2: {arg2}")
print(f"tuple_args: {tuple_args}")
print(f"dic_args: {dic_args}")
# 调用示例
example_function(1, 2, 3, 4, 5, key1='value1', key2='value2')、arg1: 1
arg2: 2
tuple_args: (3, 4, 5)
dic_args: {'key1': 'value1', 'key2': 'value2'}Lambda 表达式
Lambda 表达式用于创建匿名函数:
add = lambda x, y: x + y
print(add(2, 3))  # 输出 5
高阶函数
高阶函数可以接受其他函数作为参数:
def apply_func(func, value):
    return func(value)

print(apply_func(lambda x: x * x, 5))  # 输出 25
内置高阶函数
map:对可迭代对象中的每个元素应用函数,并返回一个迭代器。
numbers = [1, 2, 3, 4]
squared = map(lambda x: x * x, numbers)
print(list(squared)) # 输出 [1, 4, 9, 16]filter:对可迭代对象中的每个元素应用函数,并返回一个过滤后的迭代器。
numbers = [1, 2, 3, 4, 5, 6]
even = filter(lambda x: x % 2 == 0, numbers)
print(list(even)) # 输出 [2, 4, 6]reduce:对可迭代对象中的元素进行累积操作(需要导入functools模块)。
from functools import reduce
numbers = [1, 2, 3, 4]
total = reduce(lambda x, y: x + y, numbers)
print(total)  # 输出 10
4. 面向对象编程
基本概念
类(Class):类是创建对象的蓝图或模板。它定义了一组属性和方法,这些属性和方法描述了对象的状态和行为。
对象(Object):对象是类的实例。每个对象都有类中定义的属性和方法,但每个对象的属性可以有不同的值。
属性(Attributes):属性是对象的变量,用于存储对象的状态。
方法(Methods):方法是定义在类中的函数,用于描述对象的行为。
继承(Inheritance):继承允许一个类继承另一个类的属性和方法,从而实现代码重用。
封装(Encapsulation):封装是将数据和方法绑定在一起,并隐藏对象的内部实现细节。
多态(Polymorphism):多态是指不同类的对象可以使用相同的方法调用,但表现出不同的行为。
定义类和创建对象
以下是一个简单的类定义和对象创建示例:
class Dog:
    # 类属性
    species = 'Canis familiaris'

    # 初始化方法
    def __init__(self, name, age):
        self.name = name  # 实例属性
        self.age = age  # 实例属性

    # 实例方法
    def bark(self):
        return f'{self.name} says woof!'


# 创建对象
my_dog = Dog('Buddy', 3)

# 访问属性和方法
print(my_dog.name)     # 输出 'Buddy'
print(my_dog.age)      # 输出 3
print(my_dog.bark())   # 输出 'Buddy says woof!'
print(my_dog.species)  # 输出 Canis familiaris
print(my_dog)          # 输出 <__main__.Dog object at 0x000002507C862190>
继承
继承允许一个类(子类)继承另一个类(父类)的属性和方法:
class Animal:
    def __init__(self, name):
        self.name = name

    def speak(self):
        pass

class Dog(Animal):
    def speak(self):
        return f'{self.name} says woof!'

class Cat(Animal):
    def speak(self):
        return f'{self.name} says meow!'

# 创建对象
dog = Dog('Buddy')
cat = Cat('Kitty')

print(dog.speak())  # 输出 'Buddy says woof!'
print(cat.speak())  # 输出 'Kitty says meow!'
封装
封装通过将数据和方法绑定在一起,并隐藏对象的内部实现细节来保护数据:
class Person:
    def __init__(self, name, age):
        self.name = name
        self.__age = age  # 私有属性

    def get_age(self):
        return self.__age

    def set_age(self, age):
        if age > 0:
            self.__age = age

# 创建对象
person = Person('Alice', 30)

# 访问私有属性
print(person.get_age())  # 输出 30
person.set_age(35)
print(person.get_age())  # 输出 35
多态
多态允许不同类的对象可以使用相同的方法调用,但表现出不同的行为:
from abc import ABCMeta,abstractmethod

class Shape(object):
    @abstractmethod
    def area(self):
        pass

class Rectangle(Shape):
    def __init__(self, width, height):
        self.width = width
        self.height = height

    def area(self):
        return self.width * self.height

class Circle(Shape):
    def __init__(self, radius):
        self.radius = radius

    def area(self):
        return 3.14 * self.radius * self.radius

# 创建对象
shapes = [Rectangle(2, 3), Circle(5)]

for shape in shapes:
    print(shape.area())  # 输出 6 和 78.5
类方法
在Python中,@classmethod装饰器用于定义类方法。类方法与实例方法不同,它们是绑定到类而不是实例的方法。类方法的第一个参数是类本身,通常命名为cls。通过类方法,你可以访问和修改类级别的属性。
class MyClass:
    # 类属性
    class_attribute = 0

    def __init__(self, instance_attribute):
        self.instance_attribute = instance_attribute

    @classmethod
    def class_method(cls, value):
        cls.class_attribute = value

    @classmethod
    def print_class_attribute(cls):
        print(f'Class attribute: {cls.class_attribute}')

# 调用类方法来修改类属性
MyClass.class_method(10)

# 调用类方法来打印类属性
MyClass.print_class_attribute()  # 输出: Class attribute: 10

# 创建实例
obj1 = MyClass(1)
obj2 = MyClass(2)

# 实例也可以调用类方法
obj1.class_method(20)
obj1.print_class_attribute()  # 输出: Class attribute: 20
obj2.print_class_attribute()  # 输出: Class attribute: 20
class Date:
    def __init__(self, year, month, day):
        self.year = year
        self.month = month
        self.day = day

    @classmethod
    def from_string(cls, date_string):
        year, month, day = map(int, date_string.split('-'))
        return cls(year, month, day)

    def display(self):
        print(f'{self.year}-{self.month:02d}-{self.day:02d}')

# 使用类方法创建实例
date = Date.from_string('2024-07-02')
date.display()  # 输出: 2024-07-02
运算符重载
class Vector:
    def __init__(self, x, y):
        self.x = x
        self.y = y

    def __add__(self, other):
        return Vector(self.x + other.x, self.y + other.y)

    def __sub__(self, other):
        return Vector(self.x - other.x, self.y - other.y)

    def __mul__(self, scalar):
        return Vector(self.x * scalar, self.y * scalar)

    def __str__(self):
        return f'Vector({self.x}, {self.y})'

# 创建向量对象
v1 = Vector(2, 3)
v2 = Vector(4, 5)

# 使用运算符重载
v3 = v1 + v2
v4 = v1 - v2
v5 = v1 * 3

print(v3)  # 输出: Vector(6, 8)
print(v4)  # 输出: Vector(-2, -2)
print(v5)  # 输出: Vector(6, 9)
5. 复杂数据类型
字符串(String)
字符串是用于表示文本数据的不可变序列类型。
用单引号
'...'或双引号"..."包围。支持多种字符串操作和方法,如连接、切片、查找等。
s = "Hello, World!"
print(s[0])        # 输出: H
print(s[7:12])     # 输出: World
print(s.lower())   # 输出: hello, world!
print(len(s))      # 输出: 13
列表(List)
列表是一个有序、可变的元素集合,元素可以是任意类型。
使用方括号
[]定义。支持索引、切片、追加、删除等操作。
lst = [1, 2, 3, 'a', 'b', 'c']
print(lst[2])          # 输出: 3
lst.append(4)
print(lst)             # 输出: [1, 2, 3, 'a', 'b', 'c', 4]
lst.remove('a')
print(lst)             # 输出: [1, 2, 3, 'b', 'c', 4]
元组(Tuple)
元组是一个有序的不可变元素集合,元素可以是任意类型。
使用小括号
()定义。元素不可变,一旦创建就不能修改。
tup = (1, 2, 3, 'a', 'b', 'c')
print(tup[1])          # 输出: 2
print(tup[:3])         # 输出: (1, 2, 3)
字典(Dictionary)
字典是一个无序的键值对集合,键和值可以是任意类型。
使用大括号
{}定义,键值对用冒号:分隔。支持通过键访问、添加和删除元素。
d = {'name': 'Alice', 'age': 25, 'city': 'New York'}
print(d['name'])       # 输出: Alice
d['age'] = 26
print(d)               # 输出: {'name': 'Alice', 'age': 26, 'city': 'New York'}
del d['city']
print(d)               # 输出: {'name': 'Alice', 'age': 26}
集合(Set)
集合是一个无序的不重复元素集合。
使用大括号
{}或set()函数定义。支持集合操作,如并集、交集、差集等。
s = {1, 2, 3, 4, 5}
print(s) # 输出: {1, 2, 3, 4, 5}
s.add(6)
print(s) # 输出: {1, 2, 3, 4, 5, 6}
s.remove(3)
print(s) # 输出: {1, 2, 4, 5, 6}
# 集合操作
s1 = {1, 2, 3}
s2 = {3, 4, 5}
print(s1.union(s2)) # 输出: {1, 2, 3, 4, 5}
print(s1.intersection(s2)) # 输出: {3}
print(s1.difference(s2)) # 输出: {1, 2}迭代器(Iterator)和生成器(Generator)
迭代器(Iterator)
迭代器是一个对象,它包含一个可以被遍历的序列。
实现了
__iter__()和__next__()方法。可以用
iter()函数从任何可迭代对象中创建迭代器。
lst = [1, 2, 3, 4, 5]
it = iter(lst)
print(next(it))  # 输出: 1
print(next(it))  # 输出: 2
生成器(Generator)
生成器是一种特殊的迭代器,用于生成序列。
使用
yield关键字定义。每次调用
yield暂停函数并返回一个值,下一次调用时从暂停的地方继续执行。
def gen():
yield 1
yield 2
yield 3
g = gen()
print(next(g)) # 输出: 1
print(next(g)) # 输出: 2
print(next(g)) # 输出: 3