OAuth2 客户端的初探
有第三方登录这么一个业务场景,渐渐明白OAuth2的一些使用场景,也逐渐的去慢慢直观地理解了这么一项技术。
第三方登录的业务实现
我们在登录小红书Web端进行登录时,会出现如下弹窗:
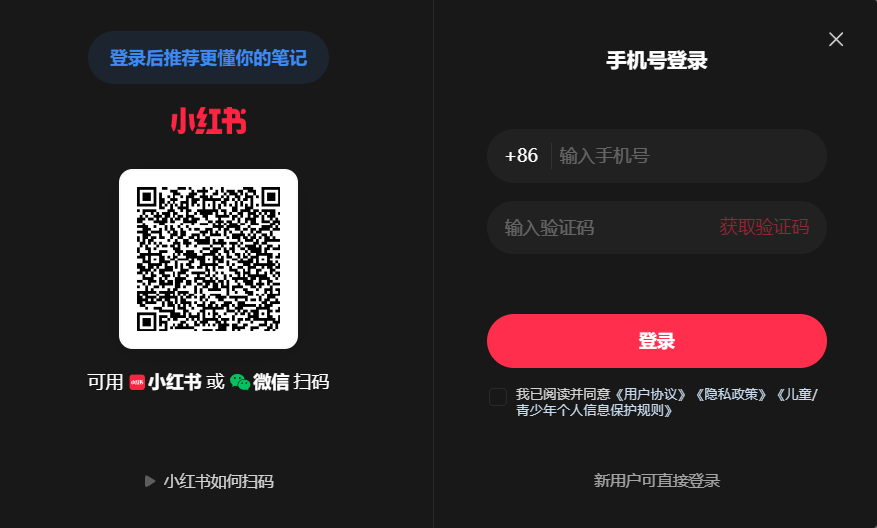 左侧可以使用微信进行扫码
此时右侧手机号验证码登录其实已经很熟悉了:我们可以在小红书后端的数据库内根据手机号来关联用户信息。
但是左侧的微信登录,又是如何获取我们用户在微信那边的数据,使得小红书能够使用我微信的身份,和小红书的用户信息进行关联呢?
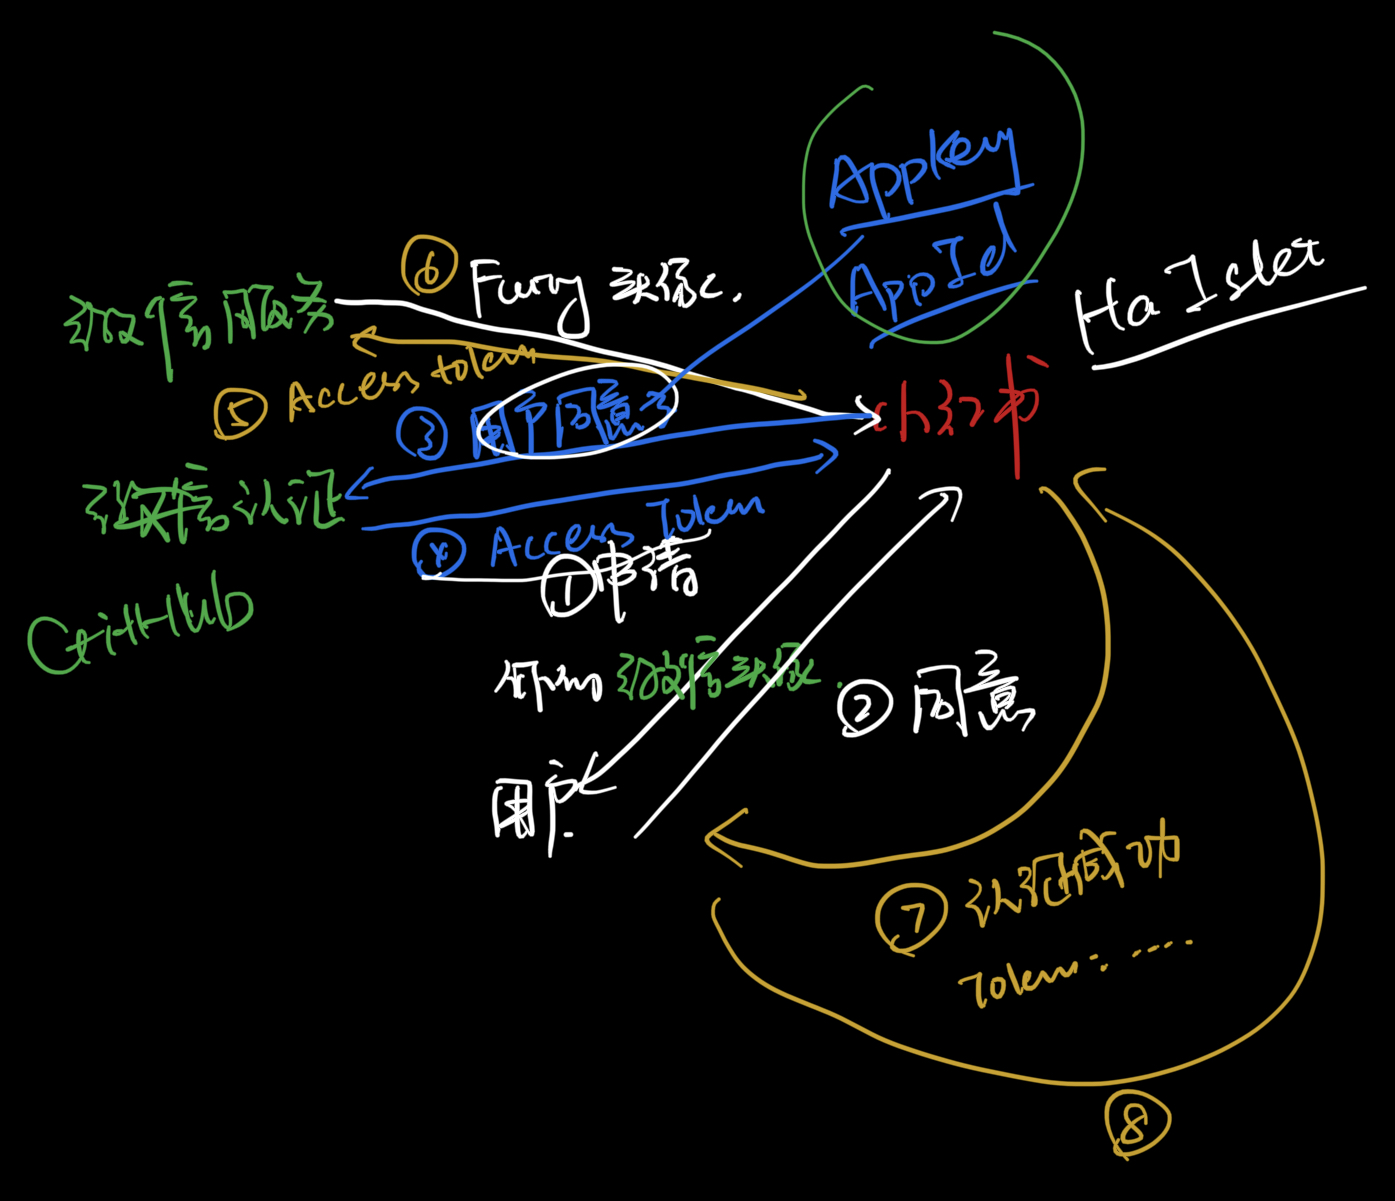 一张第三方认证的草图
好像有点乱…… 让我们从头开始画一下吧
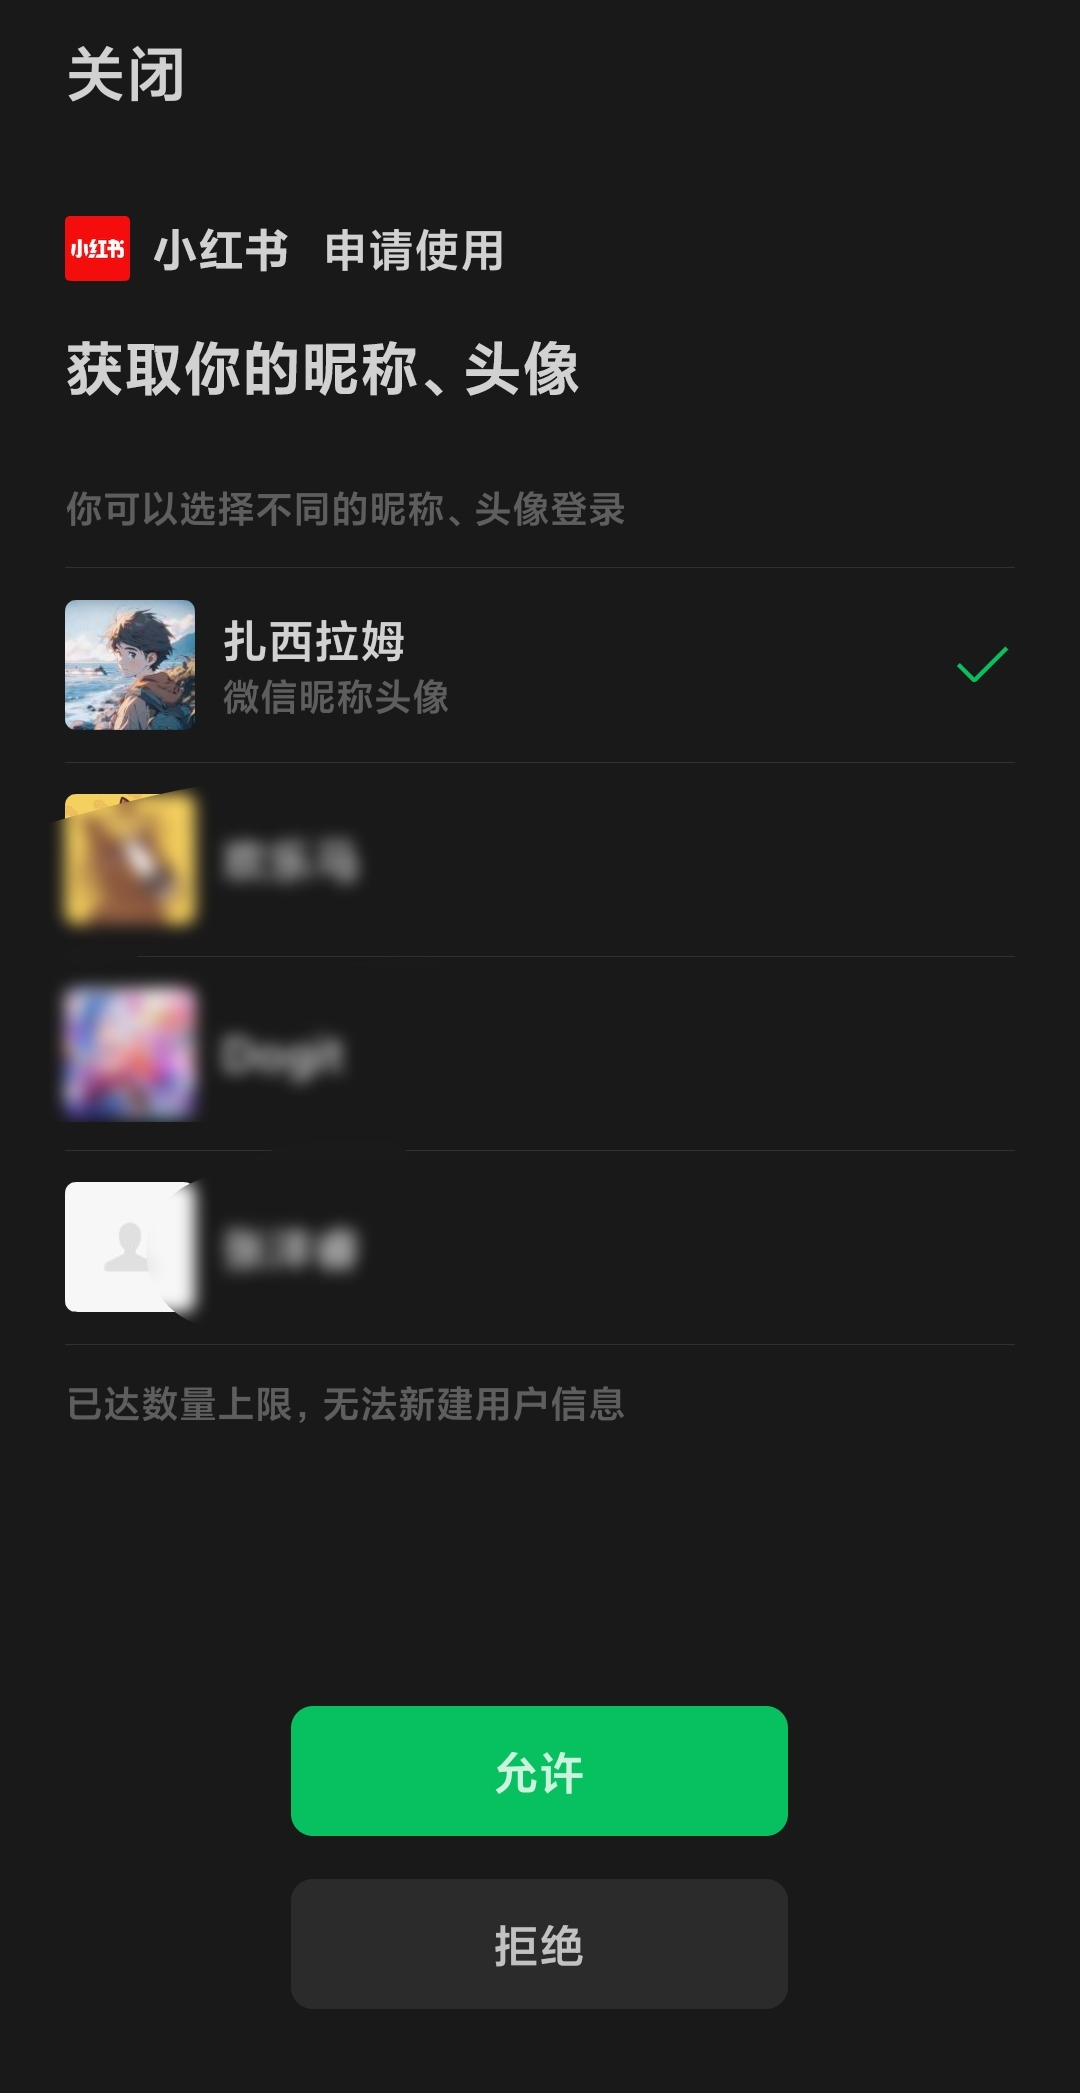
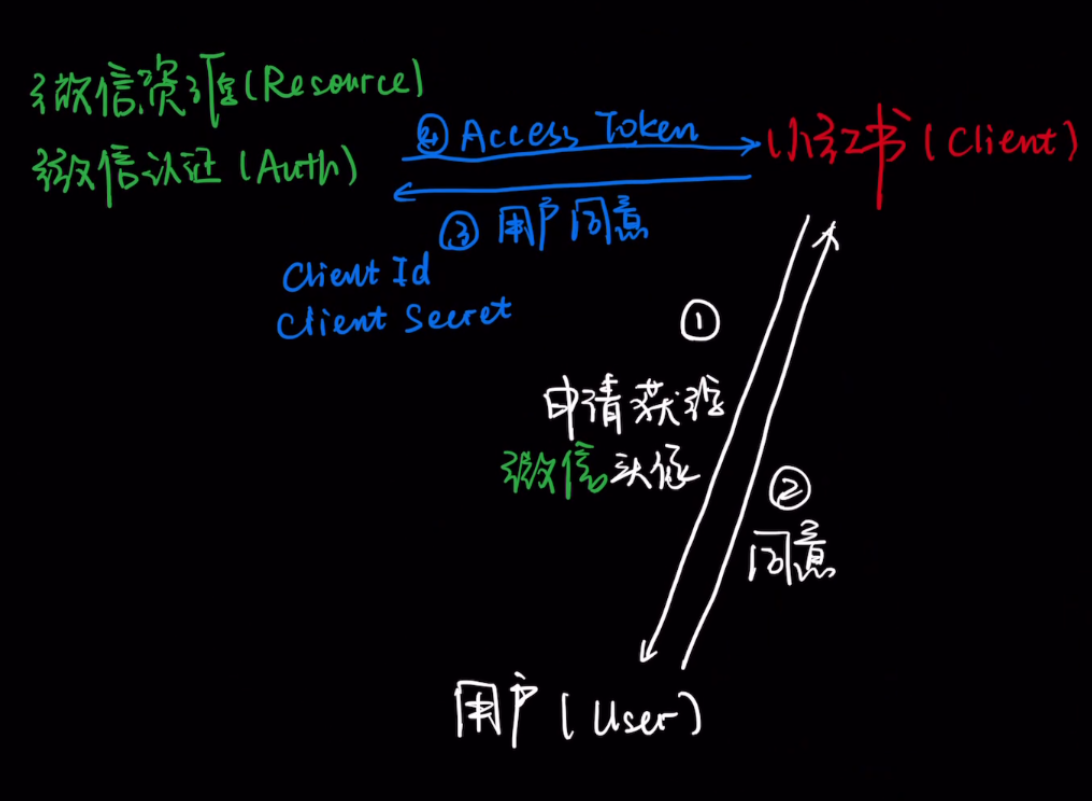
首先 用户扎西拉姆扫描二维码 微信会载入小红书网页页面,小红书(Client) 提示用户申请获取用户扎西拉姆的微信头像等微信信息
 步骤1、2:小红书向用户发送申请获得微信头像的申请
如果用户扎西拉姆允许,则小红书则告诉微信认证Auth模块:用户扎西拉姆同意了!快把用户信息给我!
微信认证看了看小红书:……你谁啊?凭什么要把扎西拉姆的头像给你这个不相干的第三方客户端?
小红书:我有我的Client Id 和 Client Secret ,这可是你一开始在我注册的时候就给我的,拿着这两个就能认识我!
微信认证:好的,给你小红书对应权限的 门票 Access Token !拿着它你就可以到资源领取处领取扎西拉姆的用户信息了!(但是这个门票只能给你扎西拉姆的昵称、头像、微信号哦!)
 步骤3、4:小红书获取 Access Token
于是凭借着这个 Access Token,小红书成功在资源处拿到了用户扎西拉姆的个人信息,并验证了一下扎西拉姆的手机号,和自己数据库里的用户ID进行了对应,小红书的后端用扎西拉姆的ID生成了访问小红书资源的 Client Token,即我们之前正常登录注册所说的token。
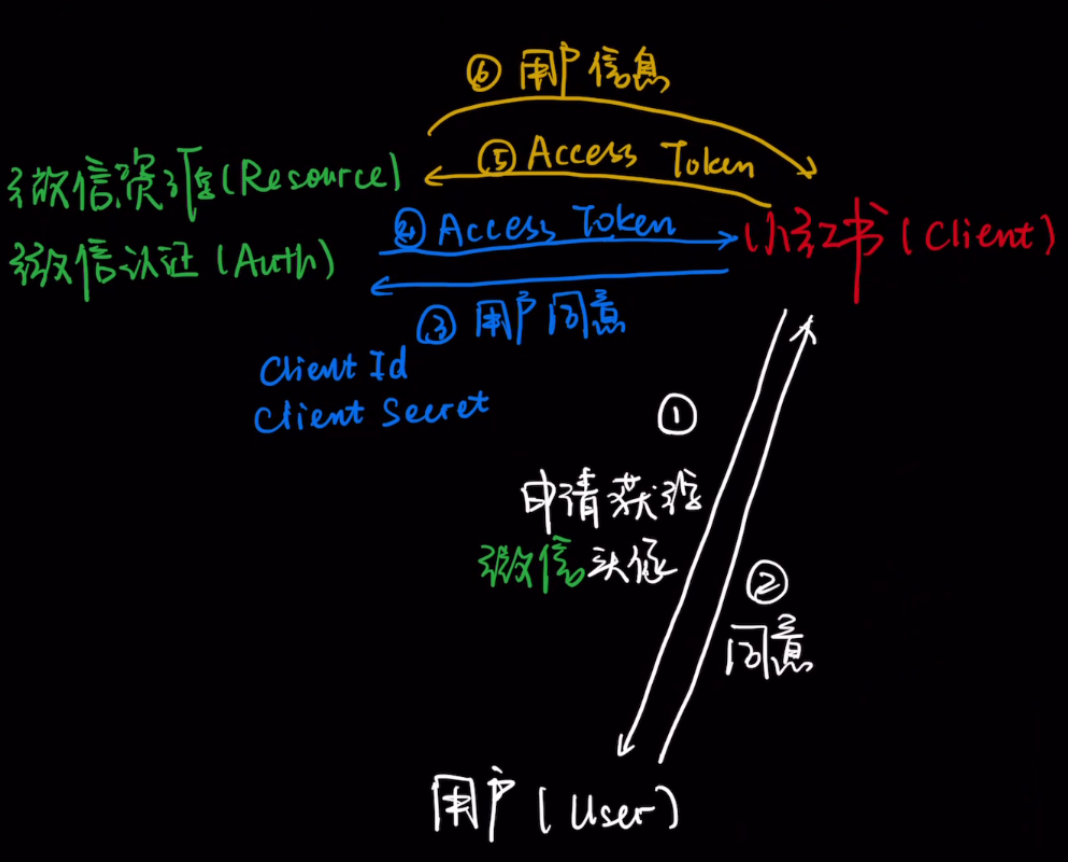 步骤5、6:小红书获取扎西拉姆的微信信息,与小红书内部数据进行对应,生成id
之后扎西拉姆用微信进行登录,就可以获得自己用户的Client Token,在小红书进行权限认证,可以查看自己小红书的信息啦!
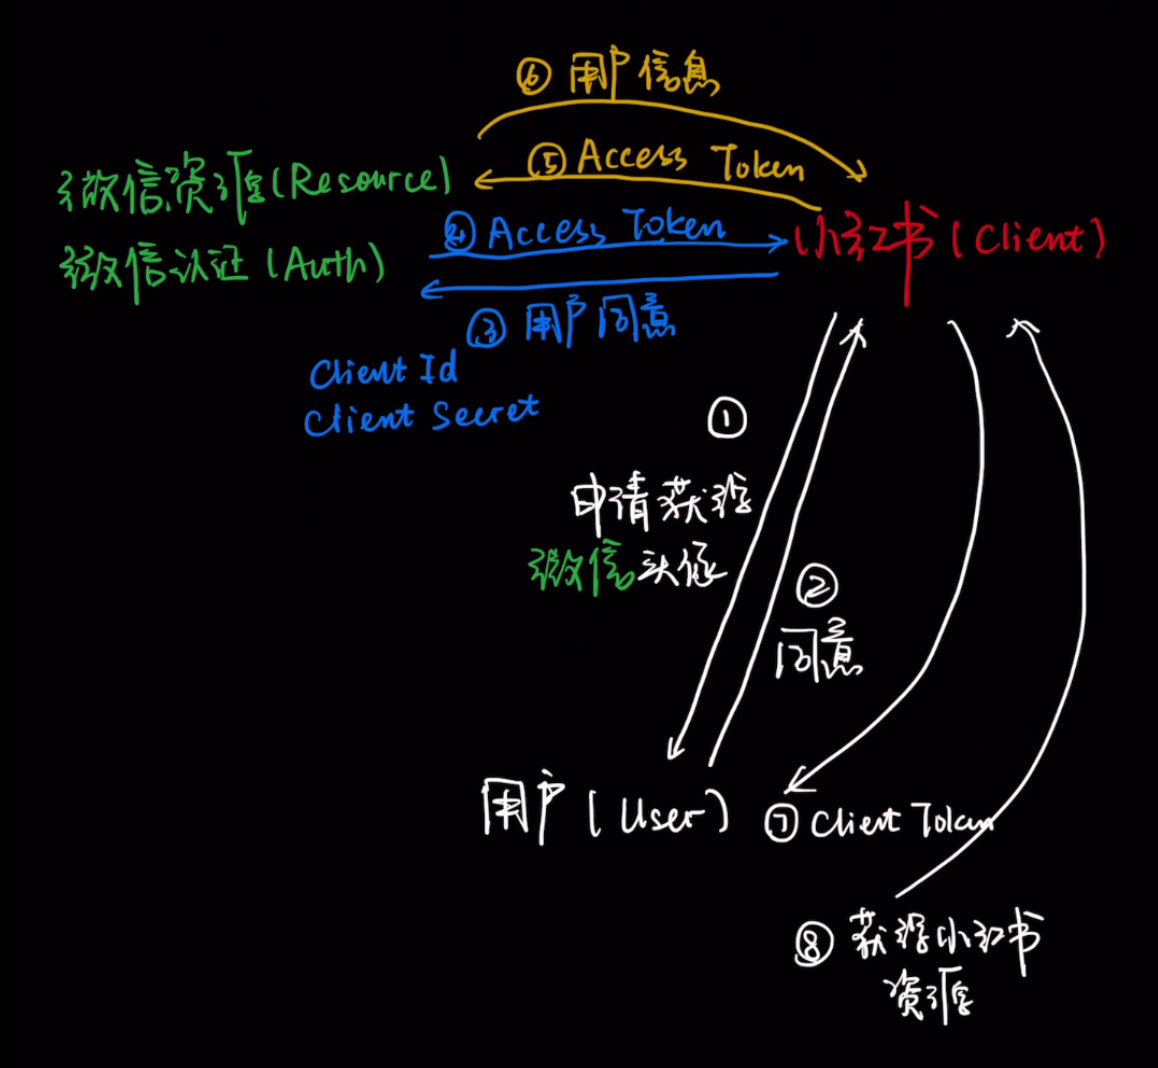 步骤7、8:使用Client Token获取扎西拉姆的小红书资源
除了微信登录,我们还可以为不同的客户端做支付宝登录、微软登录、Google登录、Github登录……
而一个技术协议就可以完美的实现以上的所有流程:OAuth2.0
OAuth2.0 的概念描述
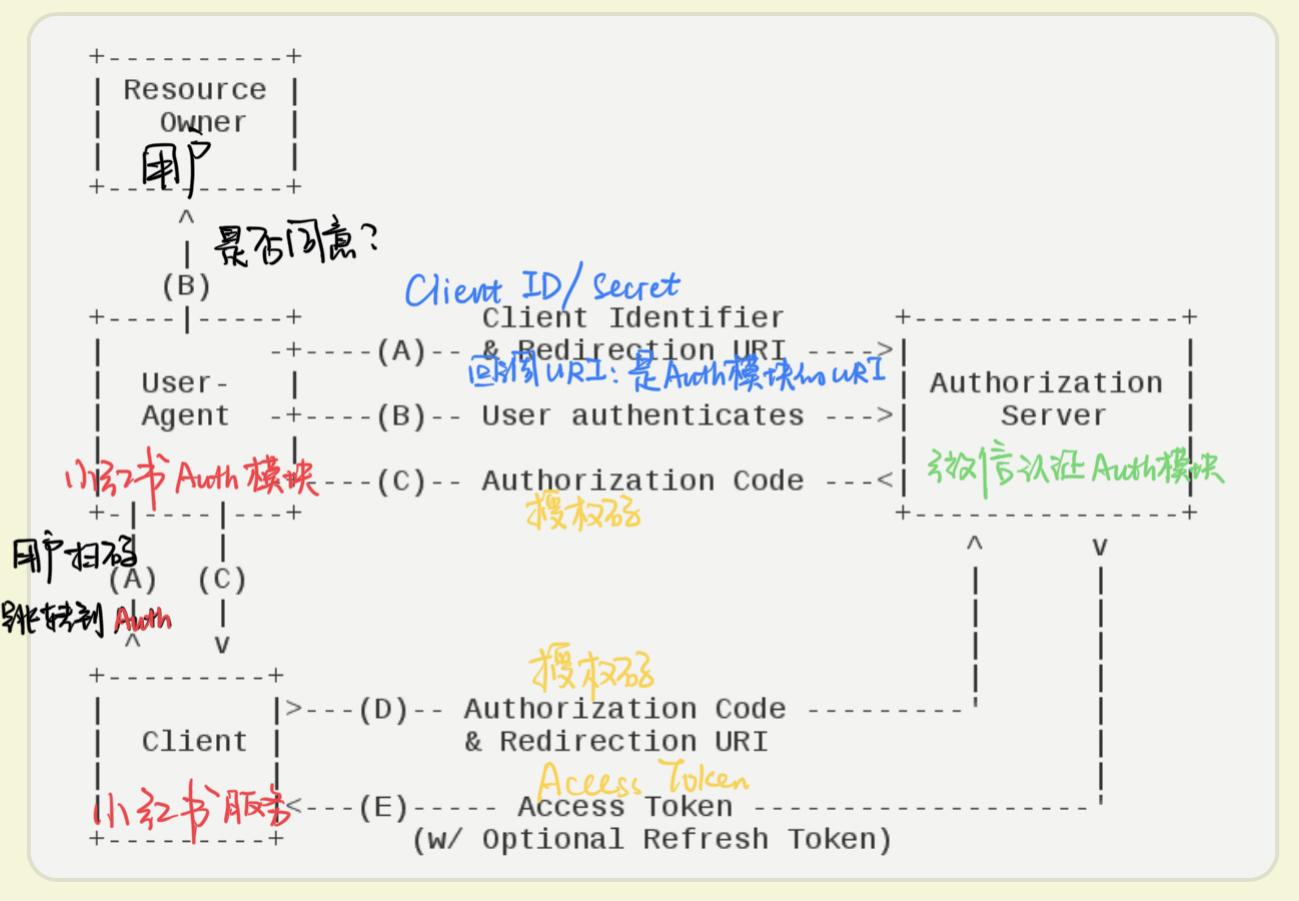
OAuth 2.0的运行流程如下图,摘自RFC 6749。
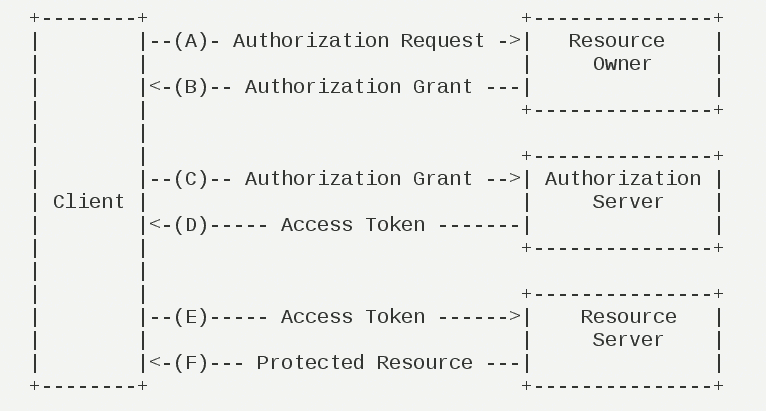 对比一下这两张图,你会发现上图 A-F 正好一一对应下图前六步
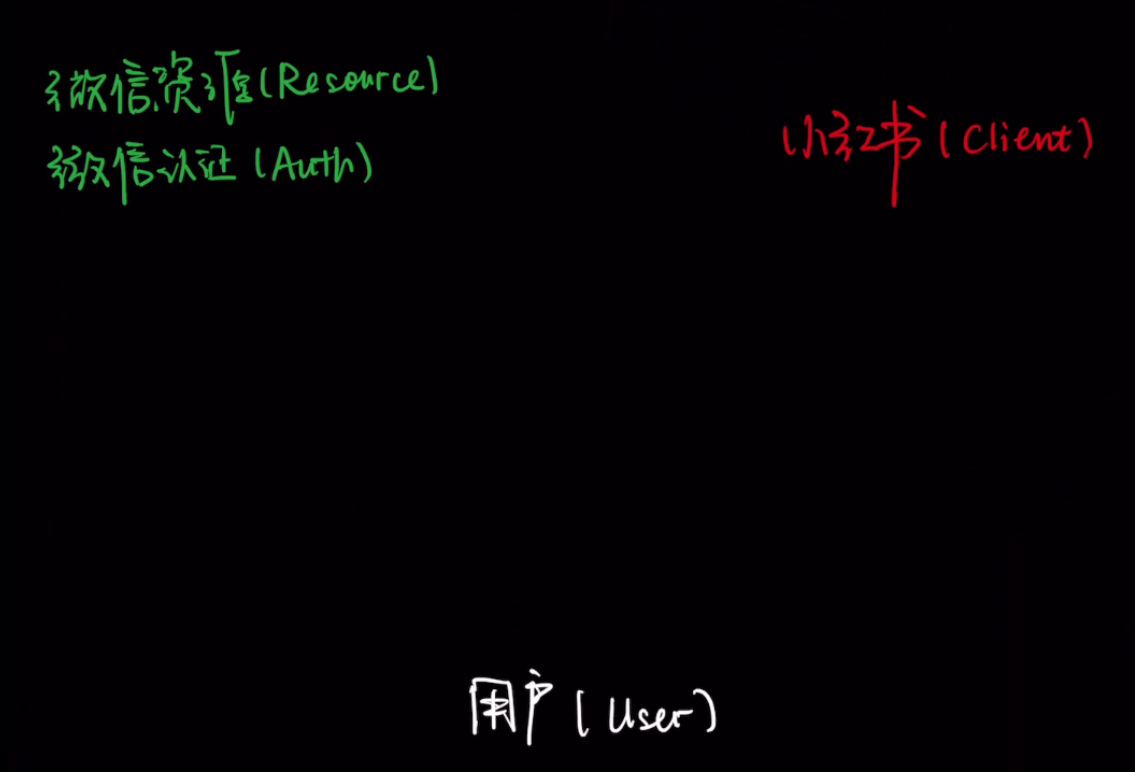
这里:
小红书是 Client
用户扎西拉姆 是 Resource Owner
微信认证Auth模块 是 Authorization Server
微信资源服务模块 就是 Resource Server
OAuth2一种最常见的授权模式是授权码模式(authorization code),下图是授权码模式的一种示例,将开始操作到获取Access Token(即黑图示的前4步)进行了详细描述:
首先,小红书的Auth模块在开发时就要确定好两件事:Client Identifier(包括Id 和 Secret)、重定向URI
一般而言,Client Id 和 Client Secret需要先手动向微信认证Auth模块申请,配置,然后将其配在小红书Auth模块的代码里或服务器环境内;
这里重定向URI即用户访问小红书Auth模块的地址,假如小红书Auth模块在本地,微信Auth模块就会让用户访问 http://localhost:8080/authExample/example?authCode=examplecode
(A)用户访问客户端,后者将前者导向认证服务器。
项目运行上线后,当用户扫描小红书上的微信登录二维码,微信首先会解析二维码,二维码内容会打开小红书Auth模块的网页
(B)用户选择是否给予客户端授权。
用户选择选取一个身份进行小红书的登录,如可以选择“扎西拉姆”、“欢乐马”、“Furry”等不同身份。
(C)假设用户给予授权,认证服务器将用户导向客户端事先指定的"重定向URI"(redirection URI),同时附上一个授权码。
比如说微信Auth模块就会让用户访问 http://小红书Auth:8080/authExample/example?authCode=examplecode ,这里 authCode 就是授权码,小红书的Auth模块就可以把授权码给到小红书其他服务模块(下称小红书Client)
(D)客户端收到授权码,向认证服务器申请令牌。这一步是在客户端的后台的服务器上完成的,对用户不可见。
(E)认证服务器核对了授权码和重定向URI,确认无误后,向客户端发送访问令牌(access token)和更新令牌(refresh token)。
小红书Client模块用 authCode 来获取微信认证模块的令牌,微信认证Auth模块在确认无误后就向小红书Client发送 Access Token 和 Refresh Token。
前后端不分离示例
由于方便考虑,我们将以上流程简化:
第三方服务端(Auth、Resource模块)使用现有的Github服务端,即我们做的都是Github第三方登录
客户端的Auth模块(User Agent)和Client模块不分开,放在一个模块内,就是我们所做的示例。
至于为什么使用Github作为服务端,因为它的Client Id 和 Client Secret非常方便获取,不需要任何材料。(可以认为只要网站想,任何网站都可以用Github登录)。所以可以用它来做示例,以下服务端均为Github,其他的服务端大同小异,都可以按照它的官方文档进行接入。
由于有重定向URI的存在,使用前后端一体的客户端Web服务是入门的最佳选择,以下是几个集成度较高的案例。
Springboot + SpringSecurity (GitHub) + Thymeleaf
客户端创建 Springboot 工程,示例 JDK17 + Springboot3.2.5 ,项目结构与源码如下:
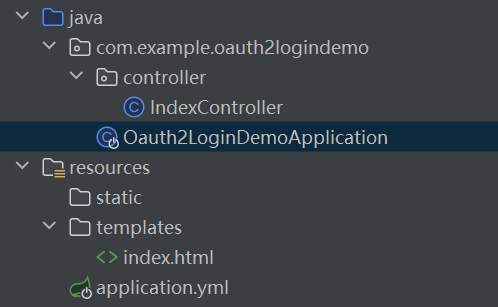 项目结构
项目结构
<?xml version="1.0" encoding="UTF-8"?>
<project xmlns="http://maven.apache.org/POM/4.0.0" xmlns:xsi="http://www.w3.org/2001/XMLSchema-instance"
         xsi:schemaLocation="http://maven.apache.org/POM/4.0.0 https://maven.apache.org/xsd/maven-4.0.0.xsd">
    <modelVersion>4.0.0</modelVersion>
    <parent>
        <groupId>org.springframework.boot</groupId>
        <artifactId>spring-boot-starter-parent</artifactId>
        <version>3.2.5</version>
        <relativePath/> <!-- lookup parent from repository -->
    </parent>
    <groupId>com.example</groupId>
    <artifactId>oauth2-login-demo</artifactId>
    <version>0.0.1-SNAPSHOT</version>
    <name>oauth2-login-demo</name>
    <description>oauth2-login-demo</description>
    <properties>
        <java.version>17</java.version>
    </properties>
    <dependencies>
        <dependency>
            <groupId>org.springframework.boot</groupId>
            <artifactId>spring-boot-starter-oauth2-client</artifactId>
        </dependency>
        <dependency>
            <groupId>org.springframework.boot</groupId>
            <artifactId>spring-boot-starter-security</artifactId>
        </dependency>
        <dependency>
            <groupId>org.springframework.boot</groupId>
            <artifactId>spring-boot-starter-thymeleaf</artifactId>
        </dependency>
        <dependency>
            <groupId>org.springframework.boot</groupId>
            <artifactId>spring-boot-starter-web</artifactId>
        </dependency>
        <dependency>
            <groupId>org.thymeleaf.extras</groupId>
            <artifactId>thymeleaf-extras-springsecurity6</artifactId>
        </dependency>
        <dependency>
            <groupId>org.springframework.boot</groupId>
            <artifactId>spring-boot-starter-test</artifactId>
            <scope>test</scope>
        </dependency>
        <dependency>
            <groupId>org.springframework.security</groupId>
            <artifactId>spring-security-test</artifactId>
            <scope>test</scope>
        </dependency>
    </dependencies>
    <build>
        <plugins>
            <plugin>
                <groupId>org.springframework.boot</groupId>
                <artifactId>spring-boot-maven-plugin</artifactId>
            </plugin>
        </plugins>
    </build>

</project>
Maven 依赖
spring:
  security:
    oauth2:
      client:
        registration:
          github:
            client-id: Ov2********
            client-secret: 9773**************
application.yml
<!DOCTYPE html>
<html xmlns="http://www.w3.org/1999/xhtml" xmlns:th="https://www.thymeleaf.org" xmlns:sec="https://www.thymeleaf.org/thymeleaf-extras-springsecurity5">
<head>
<title>Spring Security - OAuth 2.0 Login</title>
<meta charset="utf-8" />
</head>
<body>
<div style="float: right" th:fragment="logout" sec:authorize="isAuthenticated()">
<div style="float:left">
<span style="font-weight:bold">User: </span><span sec:authentication="name"></span>
</div>
<div style="float:none"> </div>
<div style="float:right">
<form action="#" th:action="@{/logout}" method="post">
<input type="submit" value="Logout" />
</form>
</div>
</div>
<h1>OAuth 2.0 Login with Spring Security</h1>
<div>
You are successfully logged in <span style="font-weight:bold" th:text="${userName}"></span>
via the OAuth 2.0 Client <span style="font-weight:bold" th:text="${clientName}"></span>
</div>
<div> </div>
<div>
<span style="font-weight:bold">User Attributes:</span>
<ul>
<li th:each="userAttribute : ${userAttributes}">
<span style="font-weight:bold" th:text="${userAttribute.key}"></span>: <span th:text="${userAttribute.value}"></span>
</li>
</ul>
</div>
</body>
</html>index.html 使用了 Thymeleaf
package com.example.oauth2logindemo.controller;

import org.springframework.security.config.oauth2.client.CommonOAuth2Provider;
import org.springframework.security.core.annotation.AuthenticationPrincipal;
import org.springframework.security.oauth2.client.OAuth2AuthorizedClient;
import org.springframework.security.oauth2.client.annotation.RegisteredOAuth2AuthorizedClient;
import org.springframework.security.oauth2.core.user.OAuth2User;
import org.springframework.stereotype.Component;
import org.springframework.stereotype.Controller;
import org.springframework.ui.Model;
import org.springframework.web.bind.annotation.GetMapping;

@Controller
public class IndexController {
    @GetMapping("/")
    public String index(
            Model model,
            @RegisteredOAuth2AuthorizedClient OAuth2AuthorizedClient authorizedClient,
            @AuthenticationPrincipal OAuth2User oauth2User
    ) {
        model.addAttribute("userName", oauth2User.getName());
        model.addAttribute("clientName", authorizedClient.getClientRegistration().getClientName());
        model.addAttribute("userAttributes", oauth2User.getAttributes());
        return "index";
    }
}
IndexController.java
package com.example.oauth2logindemo;

import org.springframework.boot.SpringApplication;
import org.springframework.boot.autoconfigure.SpringBootApplication;

@SpringBootApplication
public class Oauth2LoginDemoApplication {
    public static void main(String[] args) {
        SpringApplication.run(Oauth2LoginDemoApplication.class, args);
    }
}
Oauth2LoginDemoApplication.java
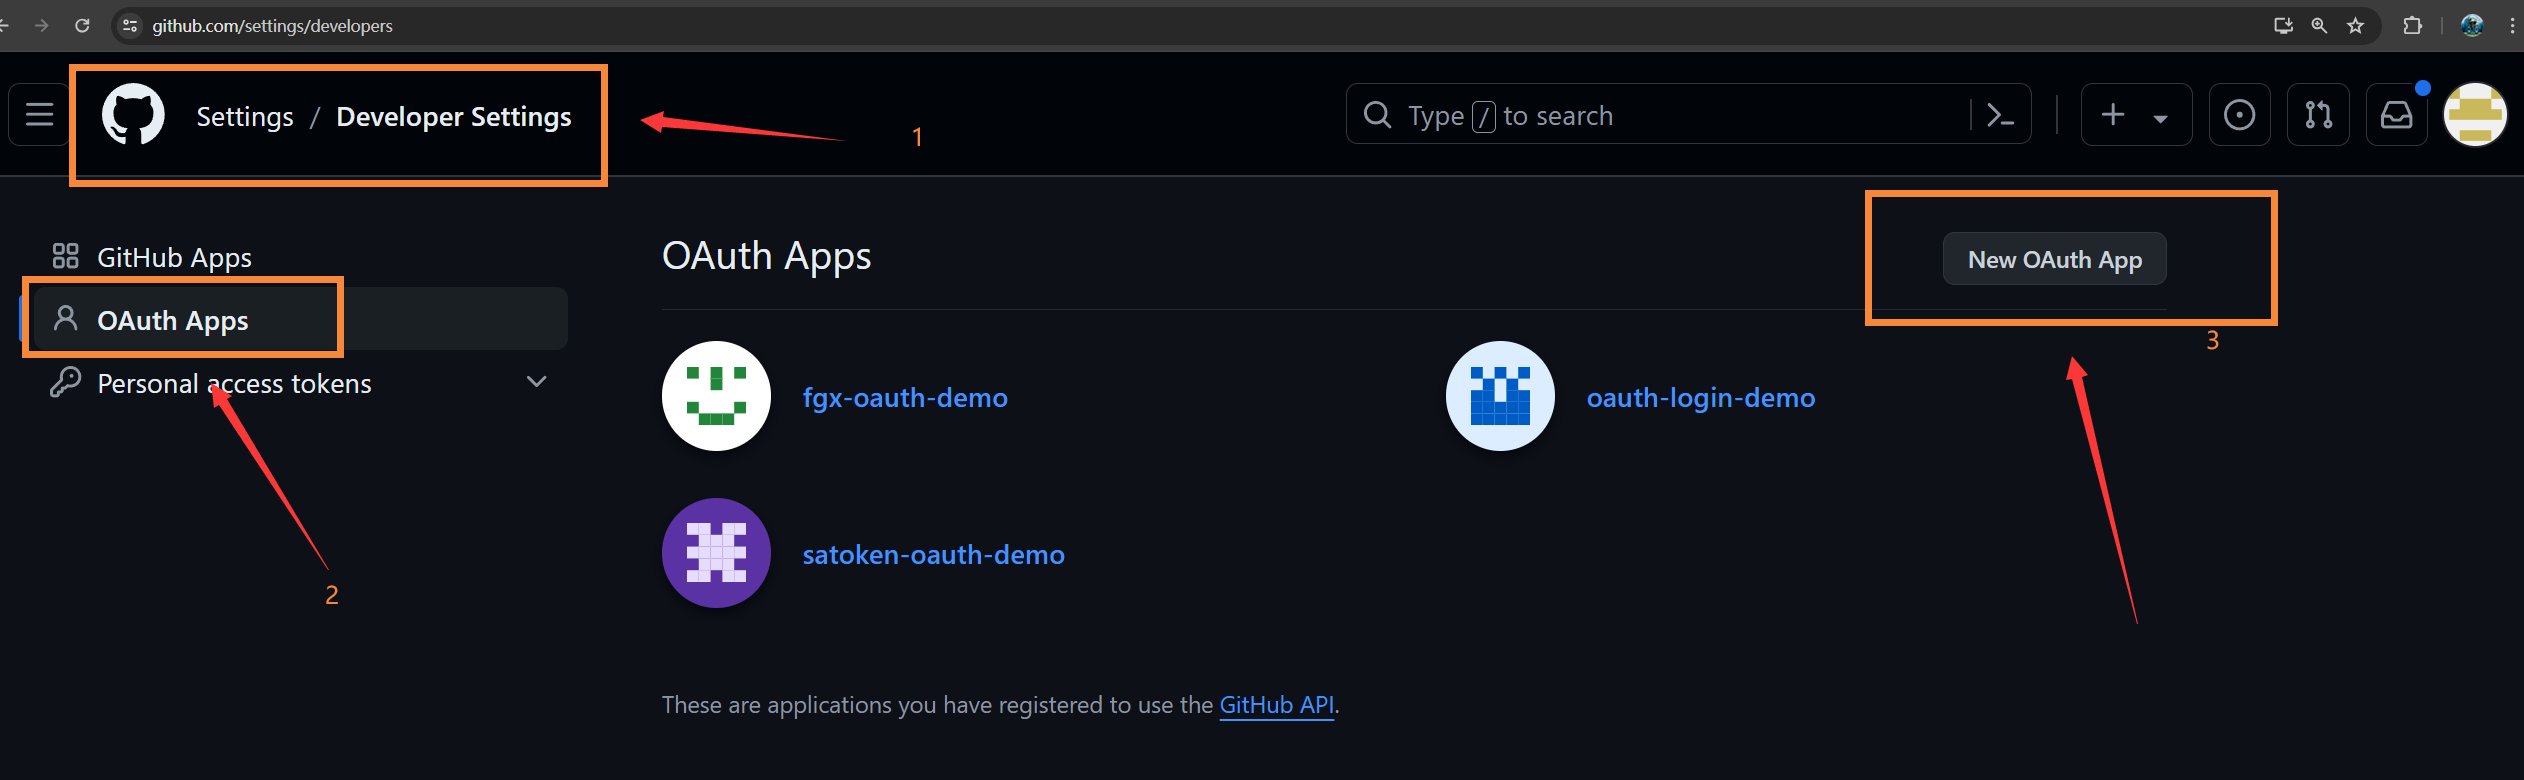
上文的 ClientId 和 ClientSecret的获取方式:

运行该Springboot程序,访问 http://localhost:8080/login 会出现“Github登录”按钮 ,之后会跳转到如下界面:
 Github认证界面
点击 Authorize 会跳转到 localhost:8080
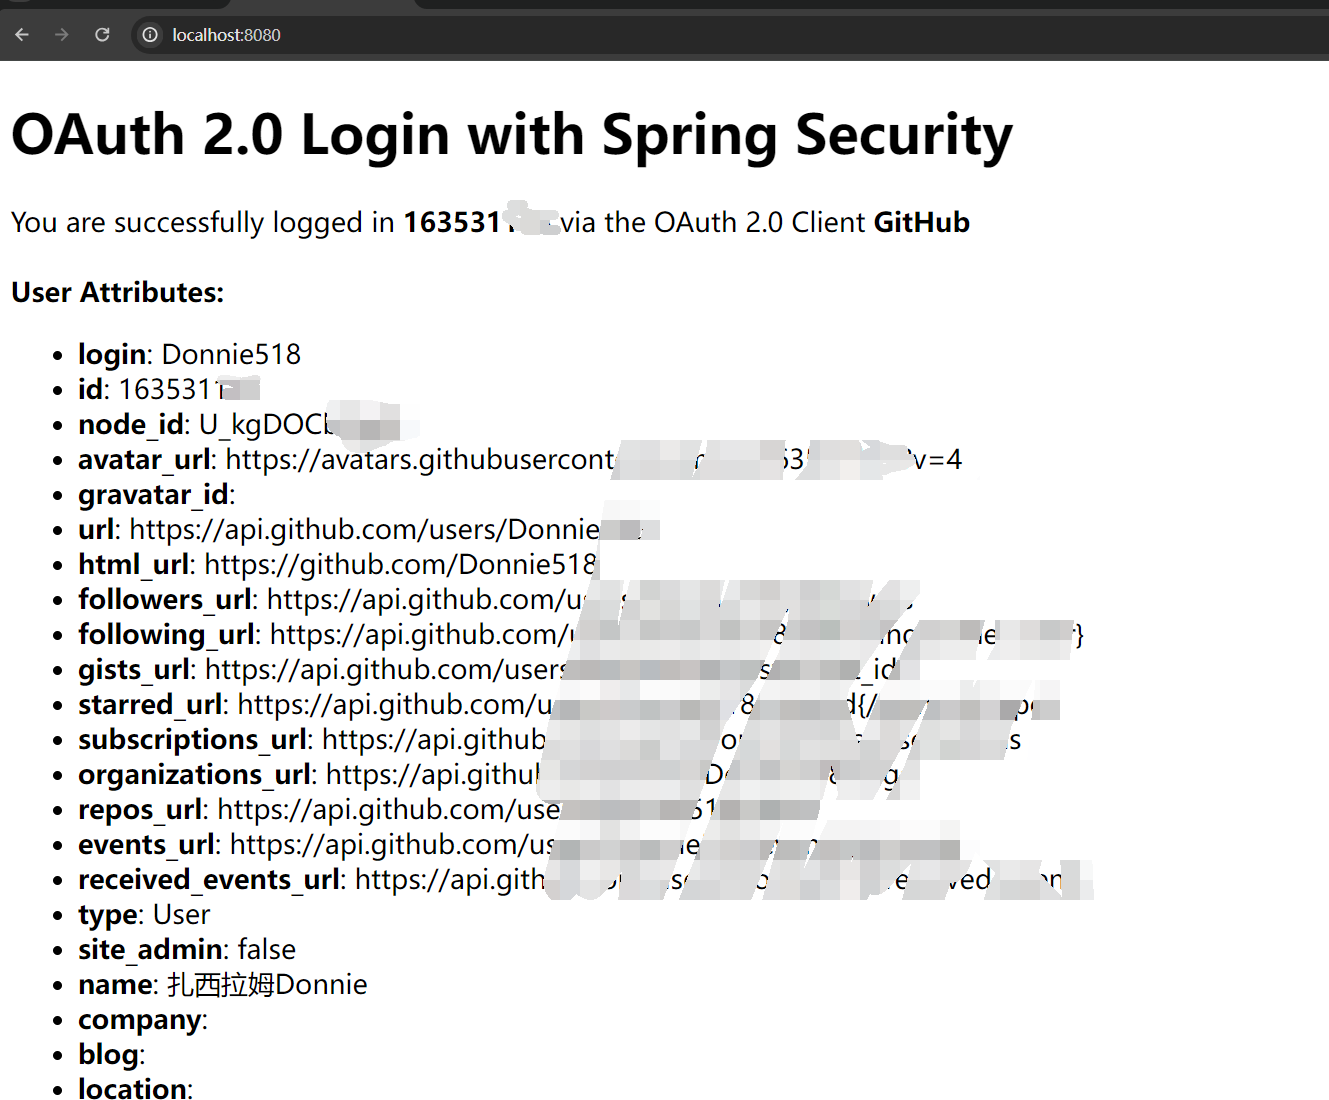 得到了Github的个人信息
这种方式是最简单的,也是封装程度最高的,可以说我们在配置以上内容的过程中几乎没有用到什么AccessToken、甚至重定向URI都是Spring Security 帮我们配好的;我们需要另一种更详细一点的实现:
Springboot + satoken + Thymeleaf
sa-token 的Client端给了一个示例源码:https://gitee.com/dromara/sa-token/tree/master/sa-token-demo/sa-token-demo-oauth2/sa-token-demo-oauth2-client
前后端分离示例
然而实际业务开发时,一般都是前后端分离开发的,这需要我们在访问重定向URI时,需要携带authrizationCode先访问Auth页面,然后把authoizationCode向后端请求接口,后端再向Github
Springboot + satoken + Vue
参考
阮一峰的网络日志 理解OAuth2.0 https://www.ruanyifeng.com/blog/2014/05/oauth_2_0.html